A Virtual Private Cloud (VPC) lets you build a multi-tier network topology - for example, a public web tier and a private database tier - with routing, access control and connectivity options managed centrally. This page covers building and operating a VPC.
Creating a VPC
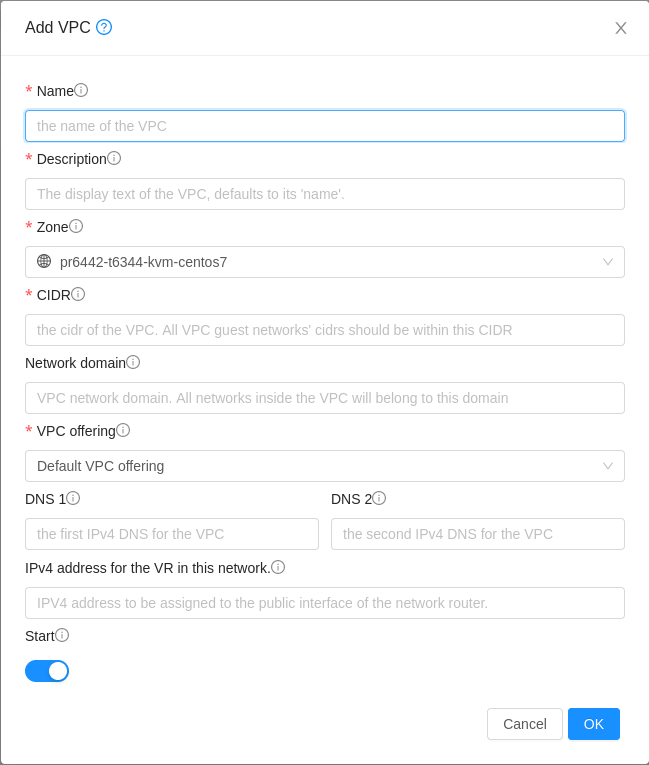
From Networking → VPC → Add VPC, choose a VPC offering and define a super CIDR range for the whole VPC (e.g. 10.0.0.0/16). Individual tiers (networks) within the VPC are then carved out of that range.
Adding tiers
Add one or more tiers to the VPC, each with its own CIDR and ACL. A typical setup might have a "web" tier that's internet-reachable and a "data" tier that only accepts traffic from the web tier. Each tier's CIDR must be unique within the VPC's super CIDR.
Access Control Lists (ACLs)
ACLs control traffic in and out of each tier, similar to security groups but scoped to the VPC's internal routing. Create an ACL list, add rules to it, then assign the list to a tier. You can also apply an ACL to a private gateway to control traffic entering the VPC from connected on-premises networks.
How ACL rules work
- Rules are numbered and evaluated in order, lowest number first - the first matching rule wins.
- ACLs are stateful: an allowed inbound connection's return traffic is permitted automatically, and isn't affected by a separate "deny all" egress rule.
- Each rule specifies a source CIDR, a protocol (TCP, UDP, ICMP, a raw protocol number, or "All"), and either a port range or - for ICMP - a type/code, plus allow or deny.
default_allow and default_deny, are also available as a starting point and can't be edited.Public IPs and static NAT
Public IPs are reserved for your VPC or account and can be associated with a specific VM using static NAT, giving that VM direct inbound/outbound access under its own public address. When a public IP or VLAN is no longer needed, release it back to the pool.
Most network offerings allow a single public IP to serve more than one purpose at once - for example, the same IP can carry source NAT, port forwarding, and load balancing rules together. Static NAT is the exception: once enabled on an IP, that IP can't also carry port forwarding or load balancing rules. If you need static NAT on an IP as well as port forwarding, allocate a separate public IP for the port forwarding rules.
Load balancing
Within a VPC you can create load balancing rules against a public IP to distribute traffic across multiple VMs in a tier - handy for scaling a web tier horizontally. An internal LB rule does the same thing but for traffic that stays entirely inside the VPC, for example balancing requests from a web tier to a pool of internal API servers ("load balancing across tiers").
Algorithms and stickiness
Each rule uses one of three algorithms to spread traffic across its instances: round-robin, least connections, or source (traffic from the same source IP is consistently sent to the same instance). For applications that need a client to keep hitting the same backend instance across requests (e.g. server-side session state), you can also enable sticky sessions using an LB-generated cookie, an application cookie, or the source IP.
Health checks
A health check can be configured against each rule so unhealthy instances are automatically taken out of rotation - defining a check path, timeout, and how many consecutive passes/failures flip an instance's status.
HTTPS/SSL
To terminate HTTPS at the load balancer rather than on each instance, upload an SSL certificate and bind it to the rule.
AutoScaling groups
AutoScaling automatically adds or removes VMs behind a load balancing rule in response to demand, so a tier can grow under load and shrink back down once it passes - useful for a web tier with a variable traffic pattern. AutoScaling builds on top of a load balancing rule, so a load balancer must be configured first (see Load balancing above).
Preparing a template for AutoScaling
Before setting up a group, make sure your template is genuinely "autoscaling-ready":
- The application, and anything it depends on (web server, runtime, environment config, database connection details, etc.) must already be installed and configured to start automatically on boot - there's no one on hand to log in and start it manually when the group scales up.
- Use user data/cloud-init if a new instance needs to pull configuration or register itself at boot time (for example, fetching secrets or joining a service registry).
- The template must have PV drivers (Windows) or virtio drivers (Linux) installed - these are what let the platform collect the CPU and memory statistics that scaling decisions are based on. Most modern cloud/distro images include virtio drivers by default, but custom-built templates should be checked.
- Build and test the template as a normal VM first - snapshot it once you've confirmed the application comes up correctly on a fresh boot with no manual steps, and use that as the AutoScale template (see Templates & ISOs).
Network requirements
AutoScaling groups run inside an isolated network (or a VPC tier) using a network offering that supports instance AutoScaling, with a source NAT IP and a load balancing rule already in place - the group attaches to that rule rather than creating its own.
The AutoScale VM profile
The VM profile defines what a newly scaled-up instance looks like:
- Zone, template and compute offering - where the instance deploys and what template/hardware it's built from.
- An optional data disk offering, if instances in the group need extra storage.
- The network to attach new instances to.
- Advanced options: SSH keypair, affinity group, and user data to inject at boot.
- Minimum and maximum instance counts - the group will never scale below the minimum or above the maximum.
- Polling interval - how often conditions are evaluated (30 seconds by default).
- Expunge grace period - how long a scaled-down instance is kept before being destroyed (120 seconds by default).
Scaling policies
Each policy is either a scale-up or scale-down action, triggered by one or more conditions. A condition compares a counter (average instance CPU %, average instance memory %, public network Mbps received/transmitted per instance, or average load balancer connections per instance) against a threshold using an operator (greater than, less than, greater/less than or equal to, or equal to).
- Duration - how long the condition must hold true before the action fires, to avoid reacting to a brief spike.
- Quiet time - a cooldown after a scaling action (300 seconds by default) before another one can trigger, giving the group time to stabilise.
VPN connectivity
Three connectivity options are available depending on what you're connecting to and how many people need access:
- Site-to-site VPN - a persistent IPsec tunnel joining your whole VPC to another network (your office, another data centre, or another VPC on Lightspeed Cloud). No client software involved - devices on either side just route to each other through the tunnel.
- Private gateway - a dedicated, non-tunnelled connection into the VPC for scenarios needing lower-level network control, e.g. a private circuit or cross-connect rather than a connection over the internet.
- Remote access VPN - lets individual devices (a laptop working from home, for example) connect in with a VPN client. Only available on a standalone isolated network, not inside a VPC tier - see the note under Remote access VPN below.
Site-to-site VPN
Setting up a site-to-site connection is a three-step process: create a VPN customer gateway describing the remote end, create a VPN gateway on the VPC side, then create the VPN connection that joins the two.
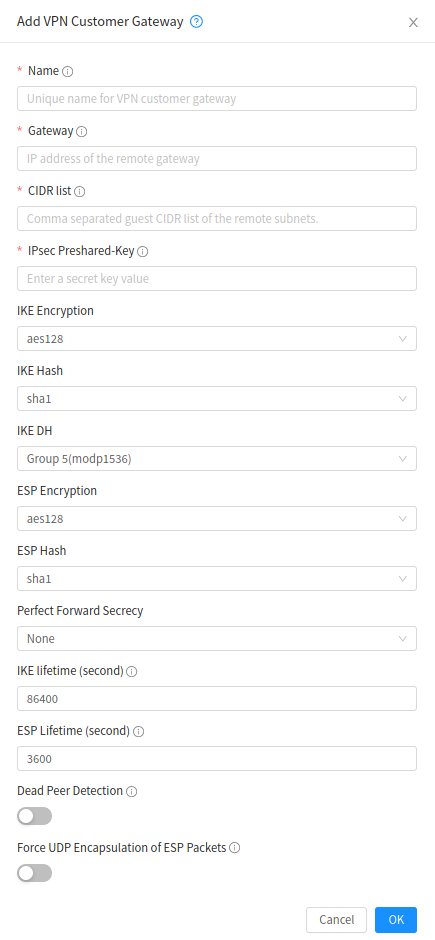
1. Create a VPN customer gateway. From Network → VPN Customer Gateway → Add VPN Customer Gateway, fill in:
- Name - a label for this gateway, e.g. "Head Office".
- Gateway - the public IP address of the remote router/firewall.
- CIDR list - the remote subnet(s) reachable through the tunnel. Must be RFC1918 (private) ranges, and can't overlap the VPC's CIDR or any other customer gateway's CIDR.
- IPsec Preshared Key - a shared secret both ends use to authenticate each other. Generate something random and long - no newlines or double quotes.
- IKE Encryption / IKE Hash / IKE DH - the phase-1 negotiation settings (the initial handshake that authenticates the two gateways to each other). Encryption is AES128, AES192, AES256 or 3DES; hash is SHA1 or MD5; DH group is None, Group-2 (1024-bit) or Group-5 (1536-bit).
- ESP Encryption / ESP Hash - the phase-2 settings (negotiates the actual keys used to encrypt traffic once phase-1 has authenticated both sides). Same algorithm choices as above.
- Perfect Forward Secrecy - when enabled, each phase-2 re-key generates a fresh phase-1 exchange rather than deriving new keys from the existing session, so a compromised key can't be used to decrypt past or future traffic. None, Group-2 or Group-5.
- IKE Lifetime / ESP Lifetime - how long (in seconds) each phase's keys are valid before a re-key is triggered. Defaults are 86400 (1 day) for IKE and 3600 (1 hour) for ESP.
- Dead Peer Detection - periodically checks the remote gateway is still reachable, so a dead tunnel is noticed and torn down rather than left hanging. Recommended to match on both ends.
- Force UDP Encapsulation of ESP Packets - enable if the remote gateway sits behind its own NAT device.
Whatever you set here has to match exactly on the remote device's IPsec configuration, or phase-1 negotiation will simply fail.
2. Create the VPC's VPN gateway. From Network → VPC → Configure → Site-to-Site VPN, confirm the prompt to create a VPN gateway if one doesn't exist yet. This uses the VPC's source NAT IP as the tunnel's local endpoint - no separate IP allocation needed.
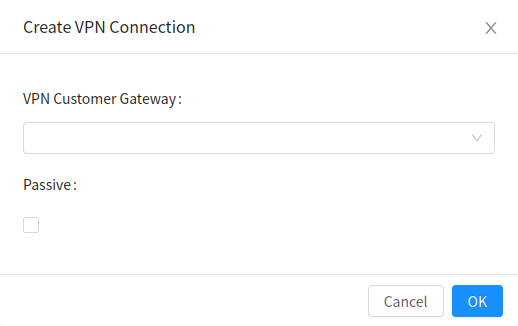
3. Create the VPN connection. Still on the Site-to-Site VPN page, switch to the VPN Connection view and click Create VPN Connection, then pick the customer gateway from step 1. If you're connecting two Lightspeed Cloud VPCs to each other rather than an external device, tick Passive on one side only - that side waits for the other to initiate. Leave it off entirely for a normal connection to an external router/firewall.
The connection typically shows Connected within 30 seconds once both ends are configured. From the connection's details you can restart it (useful after changing settings on the remote end) or remove it entirely; the customer gateway itself can be edited or deleted separately once no connection is using it.
Private gateway
A private gateway gives the VPC a dedicated, non-tunnelled path to an on-premises network - typically used for a private circuit or cross-connect rather than a connection routed over the public internet.
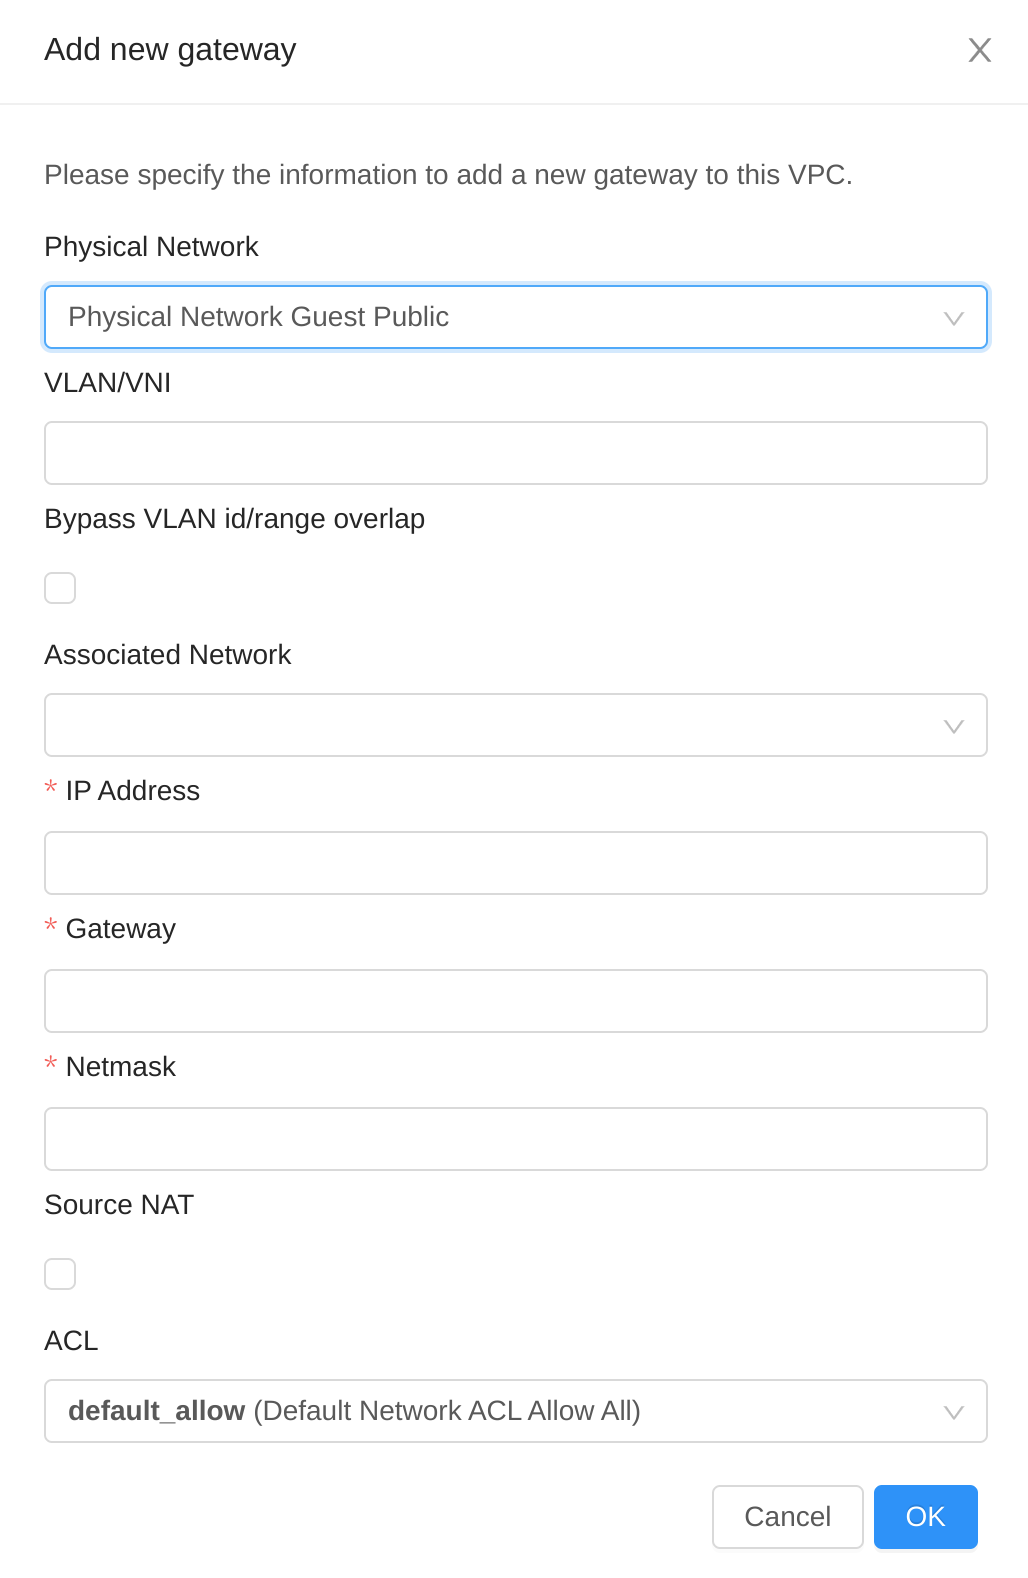
From Network → VPC → Configure → Private Gateways → Add new gateway, fill in:
- IP Address, Gateway and Netmask - the addressing for this side of the connection.
- Associated Network - the L2 or isolated network (provisioned for you as above) this private gateway rides on.
- Source NAT - enable if more than one of your VPCs shares the same CIDR and needs to reach the same on-premises network without their traffic conflicting. Can only be set when the gateway is created - to add it later, delete and re-create the gateway.
- ACL - controls ingress and egress on the gateway. All traffic is blocked by default until you attach an ACL that allows it, so if a freshly-added private gateway seems to pass no traffic at all, check this first.
A VPC can have more than one private gateway - repeat the steps above for each one. The ACL on an existing private gateway can be swapped out later from its details page via Replace ACL.
Remote access VPN
Remote access VPN lets individual devices connect in over L2TP/IPsec, using the native VPN client built into Windows, macOS and iOS (Linux typically needs strongSwan or xl2tpd configured manually). It's enabled per network rather than per VPC, and only on a standalone isolated network - not available inside a VPC tier. If you need individual remote access into a VPC, connect a small VPN endpoint (e.g. a cheap router or software appliance) to the VPC over site-to-site VPN instead, and have remote users connect to that.
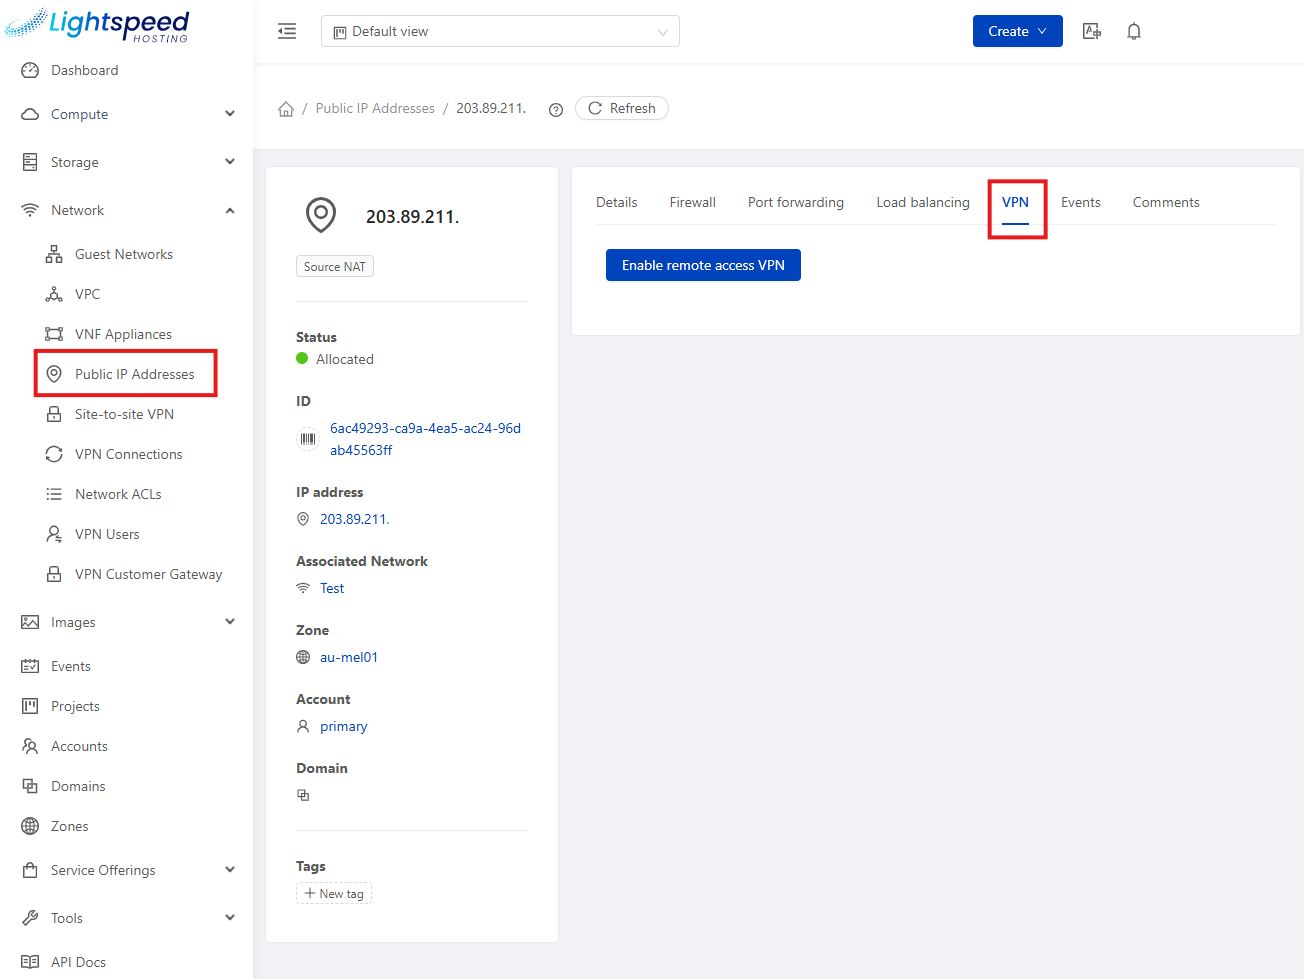
To enable it: open the network's source NAT public IP from Network → Public IP Addresses, go to the VPN tab, and click Enable remote access VPN.
This generates an IPsec pre-shared key and a VPN IP range, shown on the same tab - a VPN client needs the pre-shared key alongside a username and password to connect.
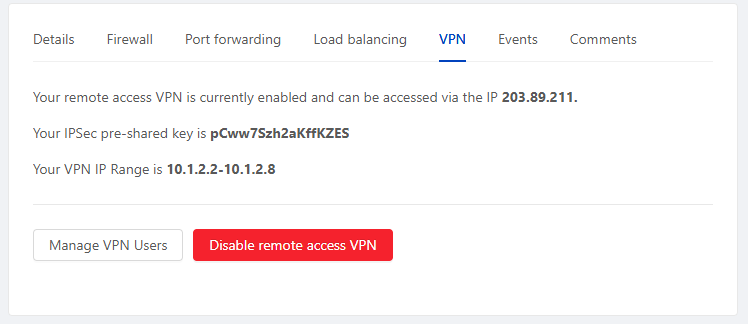
Individual VPN users also need to be created before anyone can connect - these are separate from portal logins, so you can create VPN-only credentials for people who don't need portal access. Create them from Network → VPN Users, or via Manage VPN Users on the same VPN tab. The user list is shared across every remote access VPN your account owns.
The pool of IP addresses handed out to connecting clients is preconfigured for your account - if you need it resized or need more than the default number of concurrent VPN users, get in touch.
Virtual network appliances (VNFs)
For more specialised networking needs, virtual network appliances can be deployed into a VPC from supported vendor templates - for example, a virtual firewall or SD-WAN appliance - giving you more advanced networking capability than the built-in VPC services alone.
Planning your VPC
A good starting point for most applications is: one VPC, a public-facing tier for anything that needs internet access, a private tier for databases/internal services, an ACL locking the private tier down to only accept traffic from the public tier, and a load balancer in front of the public tier if you're running more than one web server.